Set up conversion tag for your website
Conversion tracking is extremely important if you want to run Google Ads campaigns for your business. Seeing which ads lead to valuable customer actions can help you drive costs down and reach out to your audience more effectively. In addition, conversion tracking helps campaigns with smart bidding strategies to automatically optimize towards your business goals. This article will help you learn how to set up a Google Ads conversion tag on your site.
What is a conversion?
A conversion is a customer action that you’ve defined as valuable to your business, such as a newsletter sign-up or online purchase. It’s recorded when a user reaches a specific page on your website. Setting up different types of conversion actions in your account gives you a better understanding of how your campaigns are performing.
How to set up Google Ads conversion tracking in your website
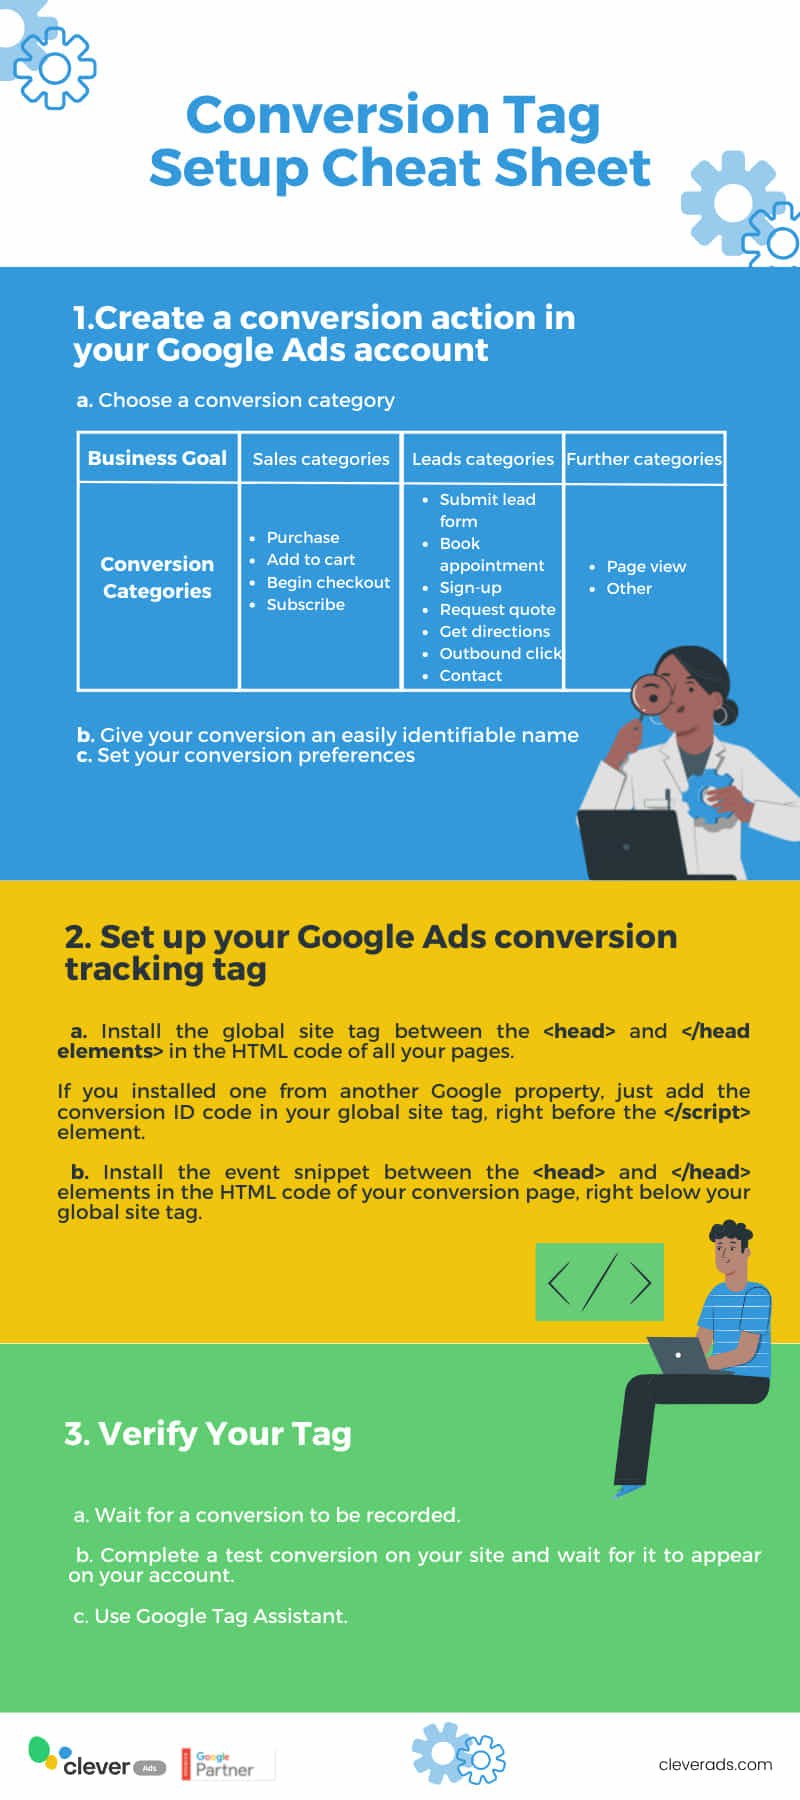
Create a conversion action in Google Ads
In your Google Ads account, click on the “Tools & Settings” icon. Under “Measurement”, click “Conversions”.
In this “Summary” section click on “New conversion action” and choose “Website“.
- Category: select a conversion action that best suits your needs. The categories are grouped into broader categories: Sales, Leads, and More categories.
- Conversion name: give the conversion action a name that will help you to easily recognize it later on in reporting.
- Value: select how you want to track the value of your conversion. You can set up a static conversion value if each action is worth the same to you, transaction-specific or dynamic conversion value if you’re tracking purchases of products with different prices, or you can set no value to your conversion (Google doesn’t recommend this). It’s important to assign conversion values in order to measure the impact of your ads and optimize towards your goals.
In case you want to set transaction-specific conversion values, I’ll provide instructions at the end of step 2.
- Count: count conversions according to your business needs. You can choose to count every conversion action a user does after interacting with your ad, or only one conversion after interacting with your ad. For sales conversions, we recommend the first option.
- Click-through conversion window: select the number of days after an ad interaction (such as an ad click) during which a conversion will be recorded. For example, if you select 45 days, any conversion that happens during that period will be counted, but ignored if it happens after.
- View-through conversion window: this is similar to the click-through conversion window, but instead of an ad interaction, a conversion can be recorded after a user views your ad. Select the period after an ad impression that you want to record a conversion.
- Include in conversions: tick this option if you want to include this action in your “Conversions” reporting column. If you untick this, it will still be included in the “All Conversions” column. This is useful if you want to track micro conversions, but not optimize for them when using an automated bid strategy.
- Attribution model: a user may interact with multiple ads from your account but there are different ways to decide how much credit each ad interaction gets for a conversion. Most advertisers use the last-click attribution, but there are many benefits to choosing other attribution models. Find out which one is right for you here.
When you’re done, click “Create and Continue”. Then, click “Install tag yourself”. Keep this page open for the next step.
Set up your Google Ads conversion tracking tag
If it’s your first time doing this, you need to set up two tags: the Global Site Tag and the Event Snippet.
The global site tag
For those who haven’t done this before, you need to select “The global site tag isn’t installed on all your HTML pages”. Copy your global site tag and paste it into each HTML page of your site, anywhere between the “<head>” and “</head>” elements.
Select “The global site tag is already installed on all pages but comes from another Google product (such as Google Analytics) or from another Google Ads account” if it applies to you. Copy the code that contains your conversion ID and paste it on the global site tag, right before the “</script>” element. Remember to do this for every page.
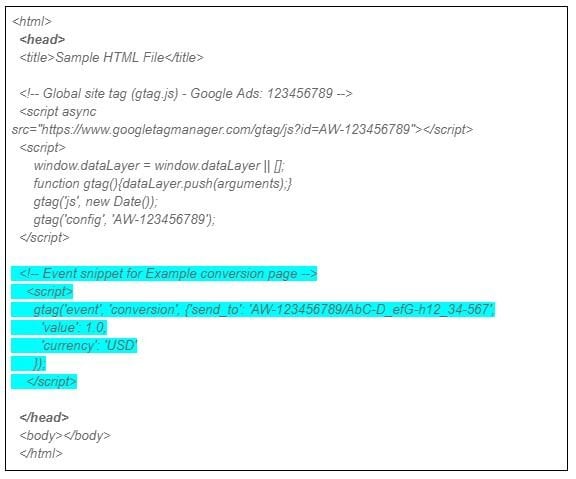
The global site tag (yellow) and conversion ID (green) code should look like what you see on the sample HTML page below:

<html>
<head>
<title>Sample HTML File</title>
<!– Global site tag (gtag.js) – Google Ads: 123456789 –>
<script async src=”https://www.googletagmanager.com/gtag/js?id=AW-123456789″></script>
<script>
window.dataLayer = window.dataLayer || [];
function gtag(){dataLayer.push(arguments);}
gtag(‘js’, new Date());
gtag(‘config’, ‘AW-123456789’);
</script>
<!– Event snippet for Example conversion page –>
<script>
gtag(‘event’, ‘conversion’, {‘send_to’: ‘AW-123456789/AbC-D_efG-h12_34-567’,
‘value’: 1.0,
‘currency’: ‘USD’
});
</script>
</head>
<body></body>
</html>
Select “The global site tag on all pages was installed already when you created another conversion action in this Google Ads account”. if it applies to you and move on to the event snippet.
The event snippet
Install the event snippet (blue) on your conversion page (the page a user is brought to after a conversion action, like a “Thank You” page, for example). Copy the event snippet from your account and paste it right below the global site tag between the “<head>” and “</head>” elements.
The event snippet should look like what you see on the sample HTML page below:
<html>
<head>
<title>Sample HTML File</title>
<!– Global site tag (gtag.js) – Google Ads: 123456789 –>
<script async src=”https://www.googletagmanager.com/gtag/js?id=AW-123456789″></script>
<script>
window.dataLayer = window.dataLayer || [];
function gtag(){dataLayer.push(arguments);}
gtag(‘js’, new Date());
gtag(‘config’, ‘AW-123456789’);
</script>
<!– Event snippet for Example conversion page –>
<script>
gtag(‘event’, ‘conversion’, {‘send_to’: ‘AW-123456789/AbC-D_efG-h12_34-567’,
‘value’: 1.0,
‘currency’: ‘USD’
});
</script>
</head>
<body></body>
</html>
If you’re tracking clicks, make sure to also add the onclick attribute to the HTML page with the button or link you want to track. The codes that should be added to the link or button tag are highlighted below.
For links:
<a onclick=”return gtag_report_conversion(‘http://example.com/your-link’);”
href=”http://example.com/your-link” >Buy now!</a>
For buttons:
<button onclick=”return gtag_report_conversion(‘http://example.com/your-link’)”>Download</button>
For button images:
<img src=”submit_button.gif” alt=”Submit” width=”32″ height=”32″ onclick=”return gtag_report_conversion(‘http://example.com/your-link’)”/>
Optional: set up dynamic conversion values
To track dynamic conversion values, you will need to add extra e-commerce platform-specific code to your event snippet. I’ve compiled a list of how-to articles from some widely-used e-commerce platforms:
-
- WooCommerce
- Shopify – skip to step 4
If your platform is not on this list, I recommend contacting their support team directly to learn how to set it up for your store.
Verify your tag
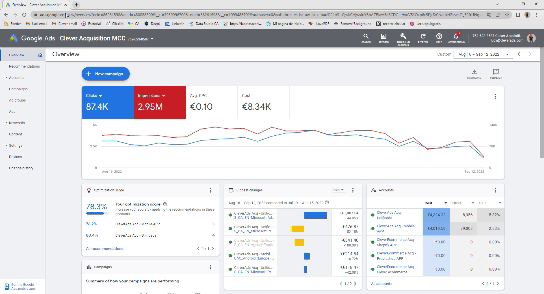
There are several ways to check if your conversion tag was set up correctly. You can see its status in the conversion library of your account. If it’s verified, the status should say “Recording conversions”.
- Wait for a conversion to be recorded. Verification usually takes up to 3 hours after someone visits your page containing the tag.
- Complete a test conversion on your site and wait for it to appear on your account. Run a search on Google using one of your target keywords and click on your ad. Then, complete a test conversion on your website. Check to see if the conversion shows up in your account after a few hours.
- Use Google Tag Assistant . Download the chrome extension and run it on the site where you want to verify if your tags are installed correctly. It will show you what tags can be found in the site and how to troubleshoot any error it detects.
Once it’s verified, you can now start focusing on optimizing your campaigns towards your conversion goals! And if you need some help, especially with setting up dynamic conversion values, our eCommerce ads plugin will set up a tag to track your conversions.


This is awesome!!