Google Ads Checklist: The 8 Must-Do’s for Your Google Ads Audit
To put it bluntly, when working on your Google Ads campaigns optimization there will never be a moment where you’re completely finished. The Google Advertising checklist that I will propose to you is something you will have to check periodically. The fact of the matter is that Google Ads campaigns need constant optimization.
[ez-toc]
A Google Ads campaign is never fully optimized. This is because nothing remains static: behaviors and competitors change, Google Ads itself and its algorithms also change constantly. It is made this way so you will be able to have something to check and do every hour of every day to improve and optimize your Google Ads campaigns.
“Succeeding in Google Ads is all about making small and continuous changes and improvements.”
Not everybody has the time or money to invest on a demanding Google Ads checklist. If that’s the case, you can always trust Google Ads Audit to detect what should be optimized on your Google Ads account.
However, it’s always useful to start learning a little about which optimizations should be done and most importantly why. It’s important even if you use specific tools to help you with your Google Ads optimization. This way you’ll be able to know if the Google Ads Audit tool you are using is actually helping you detect the most important improvements to perform in your account, or if it’s just wasting your time.
Without further ado, let’s learn about the 8 must-do’s for your Google Ads checklist.
8 Must-Do’s for your Google Ads Checklist
As previously mentioned, Google Ads optimization is all about making small changes and improvements continually.
However, if you’re curious to know exactly which optimizations to perform on a daily, weekly and monthly basis, then take a look at our article on which Google Ads optimization tasks you need to perform on a daily, weekly and monthly basis.
Google Ads Checklist Step #1: Monitor Your Query Reports and Update Your Negative Keywords Religiously.
The best defense against your ads showing up for unqualified searches are negative keywords. And the best way to avoid wasting money is keeping an eye on your query reports. In doing this, you’ll get to understand which keywords have been triggering your ads.
You never know what types of terms Google will match your business with. This is something you can sometimes predict, but most other times you will be surprised on the search queries of your Google Ads. Let’s take a closer look at your search query reports!
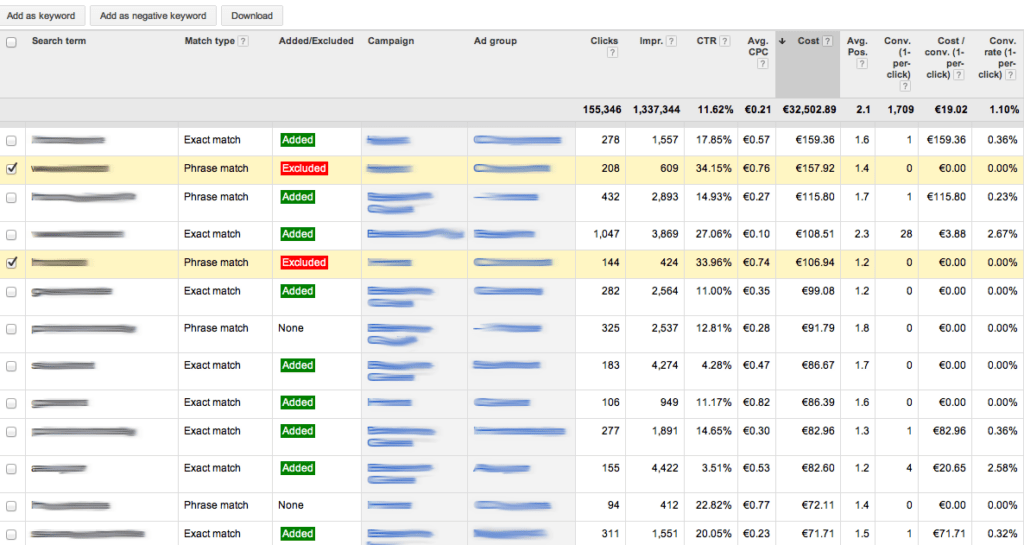
Make sure to negate the keywords that your ads show up for with clicks (and spend!) but no conversions, as these will probably have nothing to do with your business.
In addition, check the match type settings of your negative keywords. Setting “exact” match negative keywords is sometimes useless, so ensure that they are operating correctly.
Google Ads Checklist Step #2: Review Your Targeting Settings and Geo-Reports.
Setting your targeting preferences in terms of location, devices, gender and age is one of the first things you do when creating a new Google Ads campaign. It’s a really easy and fast process.
However, setting it incorrectly can become an expensive mistake. Even if you initially set it correctly, it’s not something you should leave unattended.
Google Ads Location Targeting:
- One of the worst mistakes you can make is targeting locations where you cannot sell your products or provide your services. All you have to do is remember to update your location targeting when your business expands.
- Be precise on your location targeting options. Make sure to set your targeting to “people searching for your targeted locations” OR people that are “currently on your targeted locations”, depending on your needs. Being specific about who you target and choose a more narrowed targeting option to help you avoid wasting money.
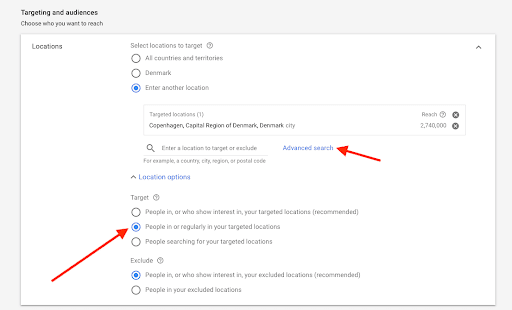
If you don’t want to solely advertise to people who are currently in a specific location, but also people interested in going to said location (if you are selling tours, for example), then the default (and suggested) option will work as it should.
However, most businesses find a better performance and lower waste of money when selecting a more specific option.
- A good reason to always keep an eye on your targeting settings and Google Ads geo-reports is that particular areas or locations might have an outstanding performance. It can also happen the other way around – with some of them having a ridiculously poor performance.
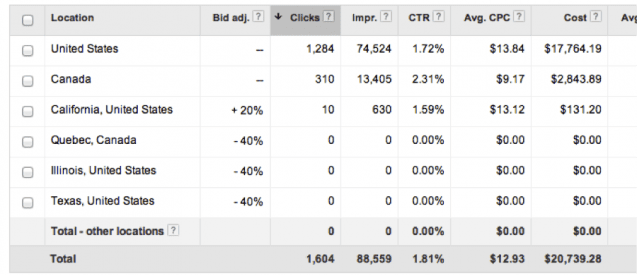
Detecting this on time will help you fine-tune your Google Ads campaigns, prioritize the well-performing locations, and decrease bids while penalizing low-performing ones.
Google Ads Device Targeting:
- If you want to show up on mobile devices, make sure that your bid modifiers are high enough to score you visibility for mobile searches. If your site isn’t optimized for mobile yet and you don’t want traffic from mobile devices, you can always set your bids to -100%.
You can lose a lot of money if mobile users click on your ads and arrive at a landing page where they won’t be able to navigate properly. They’ll struggle to make a conversion even if they’d want to, and most people won’t even try.
- Remember to optimize your bid adjustments often depending on the performance of the different types of devices you are targeting.
Other Google Ads Targeting Options:
Sometimes it happens that your campaigns perform better on specific time ranges, or for a different gender. Make sure to check all the targeting parameters and adapt your bids to take into account your campaigns performance for each of them.
Google Ads Checklist Step #3: Review Your Keyword Match Type Settings.
A properly configured Google Ads campaign should include keywords with different match types depending on your needs.
For instance, broad match is great for attracting bigger audiences at a low price while exact match helps you make sure your ad is only appearing to people searching for that same exact keyword you are bidding for. Which ultimately means that you’d reach high-quality searchers.

I’ve worked with many companies that were running their keywords on a broad match, because it’s Google’s default. As it was previously mentioned, those keywords are great for bringing a lot of traffic, but it may be unqualified traffic.
Many of the impressions will be from people that are searching for loosely related terms. By only using broad matching keywords, your campaigns will have low CTRs, poor Quality Scores and a low amount of conversions.
On the other hand, using phase or exact match keywords will enormously limit your traffic volume. It’s best to find a balance and optimize your Google Ads campaigns by keeping the broad keywords that actually result in conversions and the exact match keywords that bring you traffic.
Be sure to review your account often and stop those broad keywords that are wasting you money, as well as the exact match keywords that aren’t bringing you any traffic. Replace those you erase with new ones, review their performance and repeat the process all over again.
Google Ads Checklist Step #4: Make Sure You’re Advertising on the Right Channels.
Google Ads can be tricky, and I’m going to explain to you a mistake I found in many accounts I optimized.
If you created Google Ads campaigns to advertise on Search Networks, avoid checking the button under “Display Network”. It comes selected by default and most people fail to uncheck it.
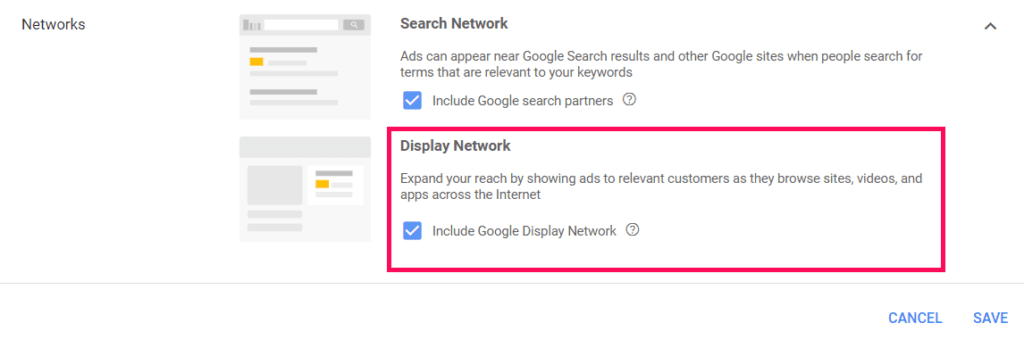
Unless you specifically want it, make sure you avoid display placements that will spend your money fast and generate a poor performance if you didn’t plan your strategy carefully.
Google Ads Checklist Step #5: Use Ad Extensions and Keep Them Updated.
Google Ads extensions make your ad bigger and more visible to people, taking up more real estate on the SERP. This is why having ad extensions will have a positive impact on your CTR.
There are many types of Google Ads extensions, but the most important to include in your ads and have optimized are Sitelinks and Callouts. One effective way to use both of them is for special sales and promotions.
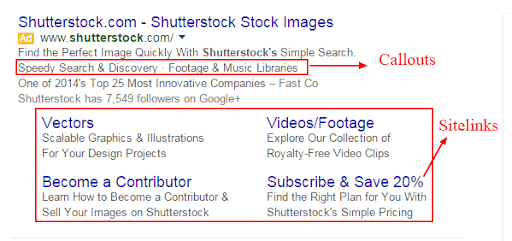
It’s important that you send users to a dedicated promotional page. Also, remember to set start and end dates to avoid running the ad extensions beyond sale dates.
Google Ads Checklist Step #6: Review Your Bidding Settings.
Google Ads will set your campaigns as “sales” focused with the bidding method to “maximize conversions”. Ensure that this is what you want out of it and that you’re 100% sure your conversion tracking is set up correctly.
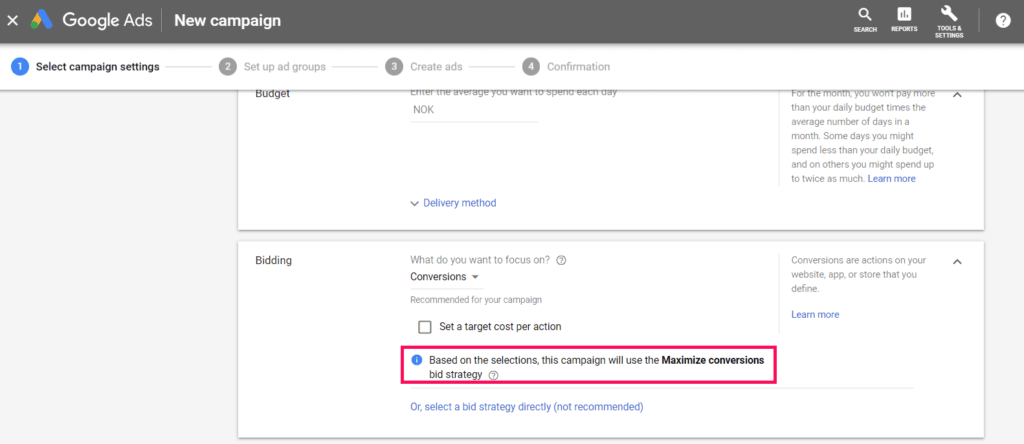
Why do I want to prevent you from leaving your campaigns with this default configuration? Mainly because it gives Google’s algorithm freedom to increase your bids as much as they deem appropriate to maximize your conversions. I would recommend you to keep some control over your bidding by using manual CPC bidding.
Google Ads Checklist Step #7: Update Ad Texts According to Landing Pages.
Optimizing ad texts is a challenging task, and you should continually test which ad copies help you convert better. The bigger the account, the more complicated it is to keep it optimized. That’s why most advertisers have problems keeping their ad copies optimized. However, it’s smart to keep in mind that your ad copies:
- Include a relevant keyword both in the headline and in the description, that’s also one of the main keywords of the landing page where the ad leads.
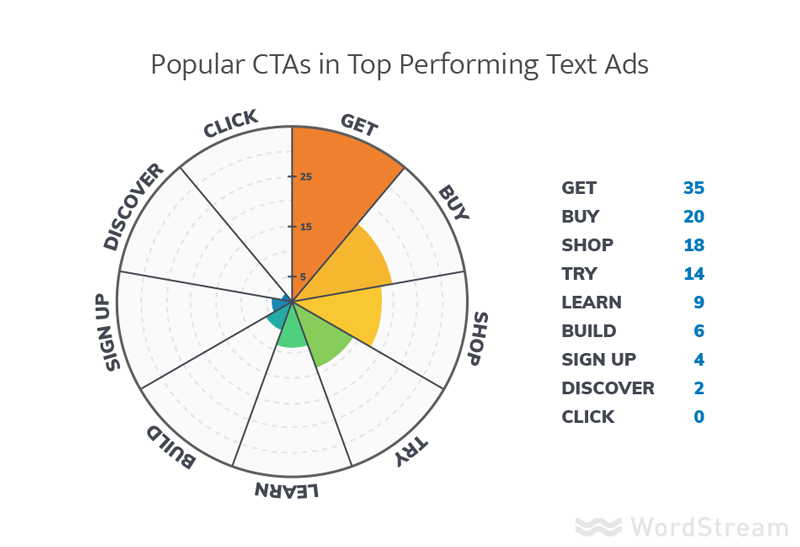
- It should include a persuasive call to action that tells people what they should do next and what to expect once they click on your ad.
- Effectively communicate your unique selling proposition. You should tell them why they should click on your ad instead of a competitor’s.

When you detect that an ad isn’t having the expected CTR, it might be one of the reasons why it’s failing to attract people’s attention and clicks. It’s probably worth rewriting your older and low-performing ads and testing if their performance improves.
Google Ads Checklist Step #8: Make Sure Conversions are Being Tracked Properly.
This is one of the biggest mistakes a Google Ads manager can make. Making sure you are tracking conversions properly is one of the most important steps on your Google Ads checklist. If you get conversions wrong, you can make bad decisions for your business that can cost you a lot of money and time figuring out what’s wrong.
Conversions and their conversion value help you understand if Google Ads campaigns are paying off or not for your business. Setting them up should be one of the first things you do when creating your campaigns, and checking that they’re working properly is a must-do on your Google Ads checklist.
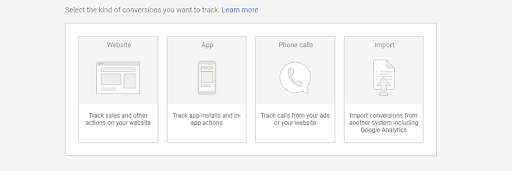
You can even set it for phone calls, and the configuration process is really simple.
However, the amount of people that are not doing it is surprising. Recent studies found that less than 60% of Google Ads accounts had at least one conversion registered, and only 29% had them tracked correctly. Here are some of the most common mistakes when setting your Google Ads conversions:
- Your conversion tracking code should be added on the page that appears right after the conversion occurs (usually your thank you page or order confirmation page). It should never be added to your product pages or the home page. This might sound obvious, but working with clients from multiple industries, I’ve seen it happen many times.
You can detect this if your click count is equal to your conversion count, or you have high conversion rates and low sales numbers that don’t match.
- It can also happen that you detect the opposite; conversion counts or rates suspiciously low. In this case, make sure you are tracking all types of conversions like phone call conversions, and that you didn’t forget to add conversion tracking codes in any existing or new landing pages.
To Wrap Things Up
If Nasa uses checklists to launch space shuttles, why not use them for Google Ads? Although Google Ads isn’t exactly rocket science, it can still be complicated. And most importantly, it can be really easy to waste a lot of money just by leaving Google Ads campaigns drifting.
The key to having your Google Ads account as optimized as possible is to have a guide: a Google Ads checklist, to keep your strategy always on track. Succeeding in Google Ads is all about making small and continuous changes and improvements.
With that being said, you don’t need to spend hours looking through your Google Ads campaigns to detect the improvements you need to apply.
Remember you can always get a quick report from Clever Ads to check what you can do to optimize your Google Ads account. Most of the suggested improvements are immediately applicable, which means you can make the changes directly from the report!


Yes! it is very useful thanks.